

Bonsai Wiring Guide and Techniques
The complete guide to choosing wire, anchoring branches, creating clean coils, and using torque to shape bonsai with confidence.
Wiring is one of the fundamental techniques used to develop bonsai.
It allows us to position branches, create movement, establish layers, improve ramification, and gradually transform the structure of a tree. But good wiring is about much more than simply wrapping wire around a branch.
Good wiring is mechanical.
The wire and the branch work together as a system. The way the wire is anchored, the angle of each coil, the spacing between turns, and the direction of the wire all determine how effectively that wire will hold and move the branch.
Once you understand those mechanics, wiring becomes much more intuitive.
This Bonsai Wiring Guide starts with the fundamentals and works toward the more advanced concepts that make wiring clean, effective, and predictable.
What Is Bonsai Wiring?
Bonsai wiring is a technique used to temporarily position branches and trunks into a desired shape.
Wire provides a temporary framework. Once the branch has been positioned, the tree gradually grows into the new orientation. Eventually, the wire can be removed and the branch will retain much of the shape that was created.
The goal isn’t to force a branch into position with brute strength.
The goal is to create controlled leverage.
That distinction is important.
A properly wired branch can be moved with surprisingly little effort because the wire is doing more than simply holding the branch. The wire creates mechanical resistance at strategic points along the branch, allowing the tree and wire to be manipulated together.
Choosing the Right Bonsai Wire
Before thinking about technique, you need the right wire.
The two most common types of bonsai wire are:
- Anodized aluminum
- Annealed copper
Aluminum is generally easier to manipulate and is an excellent choice for learning. Copper is stiffer and provides greater holding power for its diameter, but it requires more experience and physical control.
Regardless of the material, the important question is:
Is the wire strong enough to bend and hold the branch without being unnecessarily heavy or difficult to work with?
The 1/3 Rule
A useful starting point is to choose wire with a diameter approximately one-third the diameter of the branch.
For example:
9 mm branch → approximately 3 mm wire
This is a rule of thumb, not a law.
Species, branch length, wood flexibility, taper, movement required, and the direction of the bend all influence the amount of wire strength you actually need.
A long, flexible branch may require a different wire than a short, rigid branch of the same diameter.
The best practical test is simple:
The wire should be strong enough that the branch bends when you apply controlled pressure—not the wire.
If the wire simply bends while the branch barely moves, the wire is probably too light for the job.
How Long Should the Wire Be?
Wire needs to be long enough to accomplish two things:
- Create a secure anchor
- Travel from the base of the branch toward the tip
For a simple branch, you need enough wire to reach approximately the length of the branch plus additional material for the anchor and starting turns.
This is why cutting a piece of wire exactly the same length as the branch usually isn’t enough.
When wiring from a trunk or another branch, leave sufficient wire for at least one or two secure turns around the supporting structure before beginning the target branch.
A proper anchor is more important than saving a few inches of wire.
Don’t Waste Wire Either
At the same time, excessive wire creates unnecessary clutter and makes wiring more difficult.
The goal is:
Enough wire to create a strong anchor and reach the tip with clean, controlled coils—without excessive waste.
Anchoring the Wire
Before you can bend a branch, the wire has to have something solid to push against.
This is where many beginners struggle.
If the wire isn’t anchored, you can wrap the branch beautifully and still find that the entire wire assembly simply rotates when you try to bend the branch.
The anchor is what converts your hand movement into useful force.
Whenever possible, anchor the wire around a strong section of trunk or a neighboring branch.
A common technique is to wrap the wire around the supporting trunk or branch approximately 1.5 to 2 turns before transitioning onto the branch you intend to shape.
Those turns establish the foundation for everything that follows.
Think of the anchor as the foundation of the wiring system.
Without it, the rest of the wiring has little mechanical authority.
Double Wiring: One Wire, Two Branches
Whenever practical, two branches of similar thickness can be wired using a single continuous piece of wire.
This is called double wiring.
The wire is anchored around the trunk or supporting structure, travels along one branch, and then continues onto another suitable branch.
This creates a stronger system because each branch helps stabilize the other.
When selecting branches for double wiring, look for branches that:
- Are reasonably close together
- Have similar thickness
- Can be wired without crossing the wire
- Allow the wire to remain clean and controlled
If two branches aren’t suitable for double wiring, wire them independently.
Never sacrifice good wiring mechanics simply to save wire.
The 45° Rule
Once the wire is anchored, the next fundamental technique is the angle of the coils.
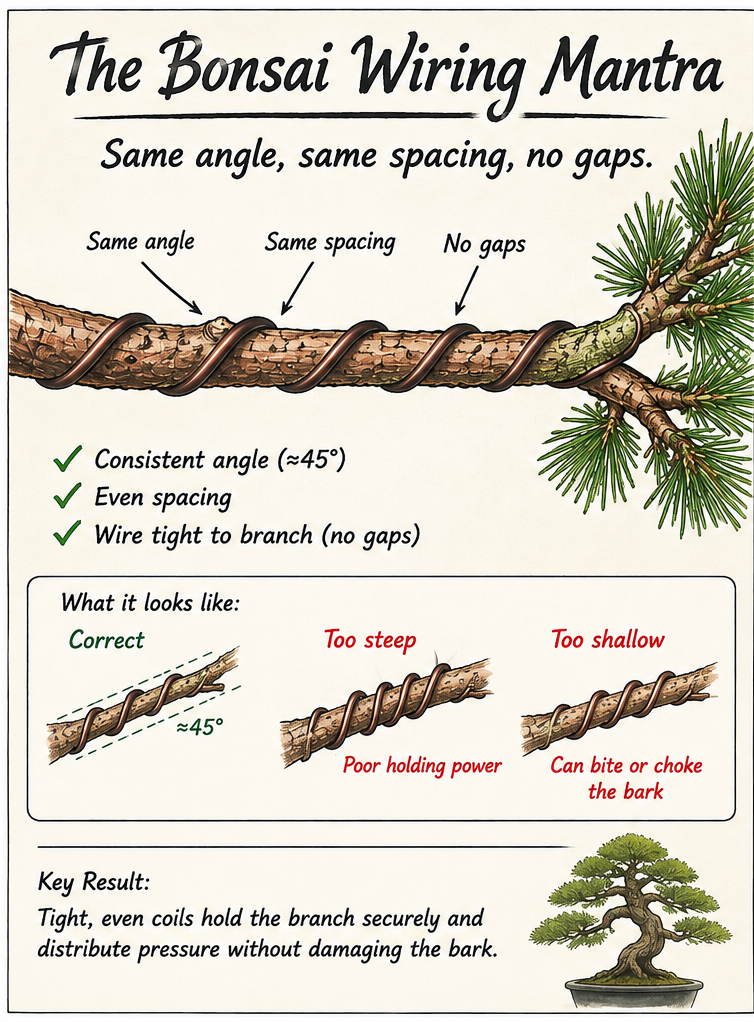
Aim for approximately 45 degrees relative to the branch.
This angle provides a useful balance between holding power, flexibility, and pressure distribution.
Too shallow, and the wire can lose its ability to control the branch effectively.
Too steep, and the wire can concentrate pressure into a smaller area and potentially bite into the bark as the branch moves or grows.
The 45° angle is therefore more than an aesthetic preference.
It is part of the mechanical design of the wiring.
The Bonsai Wiring Mantra
Same Angle. Same Spacing. No Gaps.
This is the wiring principle I want to emphasize more than almost anything else.
Same angle.
Same spacing.
No gaps.
A well-wired branch should have coils that look deliberate and consistent.
Same Angle
Every turn should follow approximately the same 45° trajectory around the branch.
The wire shouldn’t randomly change direction as it travels toward the tip.
Same Spacing
The distance between each turn should remain consistent.
This creates an even distribution of pressure and produces a clean visual rhythm.
No Gaps
The wire should sit firmly against the branch.
There shouldn’t be daylight visible between the wire and bark.
The wire should contact the branch without being forced aggressively into it.
That distinction is important:
Tight does not mean crushing.
The wire should be secure enough to control the branch while avoiding unnecessary pressure on the bark.
Why Clean Wiring Matters
Clean wiring isn’t just about making the tree look professional.
It improves the function of the wire.
When the angle and spacing are consistent, the forces created by the wire are distributed more predictably along the branch.
When the wire is loose, crossed, randomly spaced, or constantly changing angle, that control becomes less predictable.
This is why experienced bonsai artists can often make a wired tree look almost architectural.
The wire follows the structure of the tree.
It doesn’t fight it.
The Shoulder: Where the Bend Begins
Now we get into one of the most important concepts in bonsai wiring.
The shoulder.
The shoulder is the area at the base of the branch where the first working loop establishes the mechanical connection between the anchored wire and the branch being shaped.
It is the point where the wiring transitions from simply being attached to the tree to becoming a tool for applying force.
Think of it as the hinge or leverage point of the wiring system.
The anchor provides the foundation.
The shoulder establishes the leverage.
The rest of the coils transfer that control along the branch.
The Anchor and the Shoulder Are Not the Same Thing
This distinction is important.
The Anchor
The anchor is the wire wrapped around the supporting trunk or neighboring branch.
Its job is to resist the twisting force created when you manipulate the wired branch.
The Shoulder
The shoulder is the first critical loop around the target branch as the wire transitions from the anchor onto the branch being shaped.
Its position determines where the wire begins to exert useful leverage on the branch.
Together they form the mechanical foundation of the wiring.
Anchor → Shoulder → Branch
That sequence is the foundation for controlled bending.
Creating Torque
When you bend a wired branch, you’re applying force at a distance from the branch’s base.
That creates torque—a rotational effect that causes the branch to move around its structural connection.
The wire doesn’t magically make the branch flexible.
Instead, it creates a system of opposing forces.
The anchor resists movement.
The shoulder transfers that resistance into the branch.
The coils along the branch distribute the force.
Your hands then guide the branch into its new position.
This is why the shoulder is so important.
A weak or poorly positioned shoulder can allow the wire to lift away from the branch when force is applied.
A properly established shoulder keeps the wire engaged and gives you the leverage needed to make the bend.
The Direction of the First Loop Matters
The direction of the bend determines where the wire needs to establish its holding force.
For a branch being bent downward, the wire should be positioned so that the first working loop catches the top side of the branch.
As the branch attempts to return upward, that loop provides resistance.
For a branch being bent upward, the first loop should catch the bottom side of the branch.
The principle is simple:
Place the wire where it can resist the direction the branch is trying to move.
This is one of the concepts that separates simply wrapping wire from actually understanding how bonsai wiring works.
The Torsion Rule
There is another important mechanical principle:
The wire should work with the direction of the bend—not against it.
When you rotate or bend a branch, consider the rotational direction of the wire coils.
If you try to bend the branch against the natural rotational direction established by the wire, the wire can begin to lift away from the bark.
Once the wire lifts, you lose holding tension.
Instead, arrange the wiring so that the direction of the coil works with the intended movement of the branch.
This allows the wire to remain engaged with the bark while the branch is being positioned.
Think Like a Mechanic, Not a Wrapper
This is perhaps the biggest change in perspective a beginner can make.
Don’t think:
“I need to wrap this branch with wire.”
Think:
“I need to create a mechanical system that will allow me to move and hold this branch.”
That system consists of:
Anchor → Shoulder → 45° coils → Controlled bend
Once you start thinking this way, many wiring decisions become easier.
You can look at a branch and ask:
- Where is my anchor?
- Where will my shoulder be?
- Which direction am I bending?
- Where does the wire need to provide resistance?
- Is my coil direction working with the bend?
- Is my wire strong enough?
- Are my coils consistent?
- Is the wire sitting against the bark?
- Can I make the bend without forcing the branch?
Those questions are far more useful than simply asking, “How do I wrap this?”
Wiring the Branch From Base to Tip
Once your anchor and shoulder are established, work methodically toward the tip.
Keep your coils:
Consistent in angle.
Consistent in spacing.
Firm against the branch.
Don’t rush.
One of the easiest ways to ruin otherwise good wiring is to become impatient near the tip.
As branches become smaller, the wire diameter should generally decrease accordingly.
If a branch transitions from thick to thin, don’t force a heavy wire all the way into the delicate terminal growth.
Instead, transition to smaller wire where appropriate.
Never Cross Your Wires
When applying multiple wires, keep them parallel and organized.
Crossing wires creates unnecessary pressure points and makes future removal more difficult.
If two wires run along the same section of branch, they should sit neatly beside each other.
This is another reason the same angle, same spacing, no gaps principle is so useful.
Good wiring should have a visual rhythm.
You should be able to follow the wire from the trunk to the branch tip without encountering random crossings or unnecessary tangles.
Bending the Wired Branch
Once the wiring is complete, it’s time to shape the branch.
This is where patience becomes extremely important.
Don’t attempt to make one dramatic movement.
Instead:
- Establish your intended position.
- Support the branch with your fingers.
- Apply gradual pressure.
- Watch the bark.
- Watch the wire.
- Make small adjustments.
- Stop if the branch begins to show excessive stress.
The wire should help you move the branch.
It should not require you to overpower the branch.
If you have to fight the branch, stop and reassess.
You may need:
- Heavier wire
- Additional wire
- Better anchoring
- Raffia or other protection for appropriate branches
- A guy wire
- A different bending strategy
When the Wire Is Not Enough
Not every branch should be forced with progressively thicker wire.
Sometimes the correct solution is to change the technique.
A guy wire can be extremely useful when you need to pull a branch in one direction that conventional coiled wiring cannot comfortably accomplish.
For particularly thick or brittle branches, protective material such as raffia may also be appropriate before applying substantial bending force.
The objective is always the same:
Move the branch safely while maintaining control.
Wiring Is About Structure, Not Decoration
A common beginner mistake is judging wiring primarily by how it looks.
Clean wiring is beautiful—but its real purpose is mechanical.
A beautiful wire pattern that cannot hold the branch is unsuccessful.
Likewise, a branch that has been forced into position with excessive pressure may technically be bent, but the technique is still poor if the bark has been damaged or the branch has been placed under unnecessary stress.
The best wiring combines:
Mechanical control + clean technique + respect for the tree.
When Should Bonsai Wire Be Removed?
Wire is temporary.
As the branch grows, the expanding tissue can begin to swell around the wire.
This creates the familiar spiral scars that appear when wire is left on too long.
Don’t wait until the wire has deeply embedded itself.
Inspect wired trees regularly, especially during periods of active growth.
When the wire begins to bite into the bark, remove it.
In many cases, it is safer to cut the wire off coil by coil rather than attempting to unwind it from a branch that has already started setting into the wire.
Remember:
Wire marks can disappear slowly. Deep wire scars can remain for years.
The Complete Bonsai Wiring Checklist
Before you bend a branch, ask yourself:
Wire Selection
- Is the wire approximately appropriate for the branch?
- Is it strong enough to move the branch?
- Is it still flexible enough to apply cleanly?
- Would a different wire material be more appropriate?
Preparation
- Have I planned the direction of the bend?
- Do I have enough wire for the branch and the anchor?
- Can I double-wire this branch with a suitable neighboring branch?
Anchor
- Is the wire firmly anchored?
- Do I have approximately 1.5–2 turns around the supporting structure?
- Will the anchor resist the twisting force?
Shoulder
- Is the first working loop positioned correctly?
- Is it placed to resist the direction of the intended bend?
- Will it remain engaged with the branch when force is applied?
Coils
- Same angle?
- Same spacing?
- No gaps?
- No crossed wires?
- Wire sitting firmly against the bark?
Bending
- Am I working with the direction of the coil?
- Am I bending gradually?
- Am I supporting the branch?
- Is the wire actually doing the work?
Aftercare
- Am I checking the wire regularly?
- Is the wire beginning to bite into the bark?
- Is the branch responding as expected?
The Bonsai Wiring Mantra
If you remember only one thing from this Bonsai Wiring Guide, remember this:
Same Angle. Same Spacing. No Gaps.
Then remember what comes before it:
Anchor. Shoulder. Torque.
The anchor gives the wire a foundation.
The shoulder establishes the leverage.
The 45° coils distribute control along the branch.
And the correct coil direction allows the wire to work with the bend rather than against it.
Once those concepts become second nature, wiring stops being a mysterious technique and becomes a form of controlled mechanical design.
You’re not simply wrapping wire around a tree.
You’re building a temporary structure that allows you to communicate a new shape to living wood.
And, like bonsai itself, the best results come from patience, observation, and continual refinement.
Frequently Asked Questions
What is the 1/3 rule for bonsai wire?
The 1/3 rule is a common starting point: choose wire with a diameter approximately one-third the diameter of the branch being wired. It is only a guideline; branch flexibility, length, species, and the amount and direction of movement required can change the appropriate wire size.
What angle should bonsai wire be applied?
Aim for approximately 45 degrees relative to the branch. Consistent 45° coils provide a good balance between holding power and flexibility.
How long should bonsai wire be?
Cut enough wire to reach from the anchor, around the supporting trunk or branch, and all the way along the branch being wired. You need additional wire beyond the branch length for the anchor and starting turns.
What is the shoulder in bonsai wiring?
The shoulder is the first important working loop around the base of the target branch after the wire has been anchored. It establishes leverage and helps transfer the resistance of the anchor into the branch during bending.
Why does bonsai wire need an anchor?
Without a secure anchor, the wire can rotate around the trunk or branch when you apply bending force. The anchor provides the resistance needed for the wire to transfer that force into the branch.
Why should bonsai wire be wrapped at 45 degrees?
A roughly 45° coil provides a useful balance between holding the branch and distributing pressure along its length. Extremely steep or shallow coils can reduce the effectiveness of the wiring and increase the risk of pressure problems.
Should bonsai wires have gaps?
Ideally, no. The wire should sit firmly against the branch without visible gaps. However, “no gaps” does not mean crushing the bark. The goal is secure contact without excessive pressure.
Can I use one wire for two branches?
Yes. When two nearby branches are suitable in thickness and position, double wiring with one continuous wire can provide excellent stability.
When should bonsai wire be removed?
Inspect wired branches regularly and remove the wire before it begins becoming embedded in the bark. Fast-growing trees may require much more frequent inspection than slower-growing trees.
Final Thought
Wiring is one of those bonsai techniques that becomes dramatically easier once you understand why the technique works.
Learn the basics first.
Choose the right wire.
Create a solid anchor.
Find the shoulder.
Maintain your 45° coils.
Remember:
Same angle.
Same spacing.
No gaps.
Then learn to think about torque, leverage, and direction.
Once you understand the mechanics, your hands begin to follow what your eyes already see—and that is when bonsai wiring starts to become an art rather than simply a procedure.